- Get link
- X
- Other Apps
- Get link
- X
- Other Apps
यहां बताया गया है कि आप यूआई बदलने, नई सुविधाओं को जोड़ने और इसे अपनी पसंद के अनुसार अनुकूलित करने के लिए अपने फोन पर एक कस्टम एंड्रॉइड रोम कैसे स्थापित कर सकते हैं।
हर एंड्रॉइड-संचालित स्मार्टफोन एक सिग्नेचर यूआई या डिफॉल्ट रॉम प्री-इंस्टॉल्ड के साथ आता है। यह कुछ अतिरिक्त सुविधाओं के साथ एओएसपी-आधारित हो सकता है, जिसे आमतौर पर "स्टॉक एंड्रॉइड" कहा जाता है, या यह किसी विशेष ब्रांड द्वारा विकसित पूर्ण रूप से कस्टम स्किन हो सकता है। उदाहरण के लिए सैमसंग गैलेक्सी डिवाइस, वन यूआई नामक यूजर इंटरफेस का उपयोग करते हैं, श्याओमी फोन एमआईयूआई का उपयोग करते हैं, ओप्पो कलरओएस का उपयोग करता है, वनप्लस ऑक्सीजनओएस का उपयोग करता है, आदि। प्रत्येक यूआई अद्वितीय दिखता है और इसमें सुविधाओं का एक अलग सेट होता है। जबकि कुछ को सुविधा-संपन्न इंटरफ़ेस वाले UI पसंद आ सकते हैं, जैसे थीम इंस्टॉल करने और सिस्टम तत्वों को संशोधित करने की क्षमता, जबकि अन्य बिना तामझाम के एक स्वच्छ, सरल अनुभव चाहते हैं। यह वह जगह है जहाँ एक कस्टम Android ROM स्थापित करना चित्र में आता है।
आप एक कस्टम रोम क्यों स्थापित करेंगे?
एक कस्टम रोम अनिवार्य रूप से आपके फोन पर स्टॉक रोम या स्किन को बदल देता है। उदाहरण के लिए, यदि आपके पास MIUI पर चलने वाला Xiaomi या Redmi फोन है, लेकिन इंटरफ़ेस पसंद नहीं है, तो आप एक कस्टम ROM स्थापित कर सकते हैं जो UI को वैनिला एंड्रॉइड में बदल देगा। कस्टम Android ROM इंस्टॉल करने के कई फायदे हैं। यदि मौजूदा इंटरफ़ेस में बहुत सारे विज्ञापन या ब्लोटवेयर हैं, तो आप उनसे स्थायी रूप से छुटकारा पाने के लिए एक कस्टम रोम स्थापित कर सकते हैं। इसके अलावा, यदि आपके फोन के निर्माता ने आपके डिवाइस को अपडेट करना बंद कर दिया है, और आप पुराने Android संस्करण के साथ फंस गए हैं, तो आप नवीनतम सुविधाओं का स्वाद लेने के लिए OS के नए संस्करण पर आधारित एक कस्टम ROM का उपयोग कर सकते हैं। कुछ मामलों में, लक्ष्य डिवाइस की कुछ हार्डवेयर विशेषताओं को अनलॉक करना भी संभव है जो कि आफ्टरमार्केट रोम के माध्यम से स्टॉक कॉन्फ़िगरेशन में अन्यथा दुर्गम हैं। अब जब आप जानते हैं कि एक कस्टम रोम क्या कर सकता है, आइए आपको बताते हैं कि आप इसे अपने एंड्रॉइड फोन पर कैसे इंस्टॉल कर सकते हैं। ध्यान दें कि, व्यक्तिगत कंप्यूटरों के विपरीत, कोई सार्वभौमिक रूप से इंस्टॉल करने योग्य कस्टम रोम वितरण नहीं है, हालांकि प्रोजेक्ट ट्रेबल ने इसे जेनेरिक सिस्टम इमेज (जीएसआई) की अवधारणा को पेश करके कुछ हद तक भौतिक बना दिया है। जबकि आपके पसंदीदा कस्टम रोम से सभी अच्छाइयों के साथ छिड़का हुआ जीएसआई स्थापित करना संभव है, ध्यान रखें कि यह आपको उसी स्तर की स्थिरता और प्रदर्शन प्रदान नहीं कर सकता है जो आप अपने डिवाइस के लिए ठीक-ठीक समर्पित कस्टम रोम से प्राप्त कर सकते हैं।
तो इन सब के साथ कहा जा रहा है, यदि आप आफ्टरमार्केट डेवलपमेंट सीन के लिए नए हैं, तो आपको एक ROM इंस्टॉल करना होगा जो विशेष रूप से आपके फोन के लिए बनाया गया है। ऐसा करने में विफल रहने पर आपका फ़ोन #Dead हो सकता है। फिर आपको इसे पुनर्प्राप्त करने या सेवा केंद्र पर ले जाने के तरीके खोजने होंगे।
NOTE
एक कस्टम रोम स्थापित करने से कुछ उपकरणों पर वारंटी रद्द हो सकती है क्योंकि इसमें बूटलोडर को अनलॉक करना शामिल है। सावधानी से आगे बढ़ें क्योंकि आप अस्थायी कारण बन सकते हैं
एक कस्टम रोम स्थापित करने के लिए पूर्वापेक्षाएँ
अपने फ़ोन पर एक कस्टम Android ROM स्थापित करना शुरू करने से पहले आपको कुछ चीज़ों की आवश्यकता होती है। आइए उन सभी पर चलते हैं ताकि आपका डिवाइस इंस्टॉलेशन प्रक्रिया के लिए तैयार हो
- An Android device
- An unlockable bootloader
- If you don't know how to unlock the bootloader of your phone, head over to the XDA forums, search for your device name followed by "unlock bootloader," and you'll find a guide. The process is different for every OEM, so make sure you follow the one specifically meant for your device.
- A custom recovery
- In general, TWRP is a good option, and you can follow our detailed guide to install TWRP on your phone. With that said, nowadays, some custom ROM distributions offer tailor-made recovery images that you need to use for the sake of compatibility, so please follow that if such instructions are present.
- A custom ROM ZIP file that you want to install
- Once again, head over to the XDA forums, search for your device, go through all the available ROMs, and choose the one you want to install. You can also take a look at our Android 13 custom ROM list to get started.
- Please note again that custom ROM installation instructions can and do vary by device and ROM. If your ROM of choice comes with its own instructions, please follow them instead of this guide. This guide is a general list of instructions and does not take into account any special device instructions.
- (Optional) GApps or Google Apps
- Access to a computer with ADB and Fastboot installed. Windows users are also advised to install the latest OEM USB driver for their Android device.
- A little bit of patience
How to install a custom ROM
Now you have everything ready to install a custom ROM, we can begin the process.
Step 0: Back up your data
There's one more thing you need to do before starting the installation: Make a backup of all your data. Since a custom ROM is essentially third-party software, you need to unlock the bootloader of the target device in order to install it. The process requires a full data wipe by design.
Next, during the installation phase, you have to recreate the internal data partition from scratch, which means another wipe is necessary. There is absolutely no need to worry, as we have a detailed guide to help you back up every aspect of your phone's data. Just make sure you do that, so it's easy to restore your data once you install a new ROM.
Step 1: Downloading the correct ROM

As we mentioned earlier, the best way to do this is to head over to the XDA forums for your device and look for a ROM that best suits your needs. Popular custom ROMs like LineageOS also maintain download portals, from which you can directly grab the most up-to-date build without much hassle.
Custom ROMs are device-specific, so download a ROM that's made specifically for your device. Also, there can be multiple variants of the same device based on carrier, region, etc. so keep this in mind too. Locate the appropriate custom ROM build for your exact device variant. If you're not sure, ask about compatibility in the XDA Forums.
Once you've found the ROM you want to install, download the ZIP file either on your computer or on your phone. Since you will need to data wipe your phone in some of the later steps, it's advisable to do the file transfer later on, after the data wipe. But make sure that your phone can connect to your computer and can receive files, just to be clear that your device drivers are in place. Later on, you will need to copy the ROM file to the root of your phone's internal storage. Don't extract the ZIP file, keep it as it is.
Step 2: Downloading GApps or Google Apps
Custom ROM distributions usually do not come with Google's apps and services pre-installed. So if you want to be able to sign in with your Google account and use Google's services like Sync, Play Store, Gmail, Drive, etc., you'll need to install a separate GApps package. There are multiple variants of GApps you can install. You can refer to our guide on finding the right Gapps package and download one that's appropriate for you. This will also be in the form of a ZIP file. Download and transfer it to your phone's internal storage. You can also install them right from your PC/Mac if you opt for the adb sideload method.
Some custom ROMs (like Pixel Experience and Evolution X) come with GApps pre-installed. In such cases, you don't have to flash the GApps file separately.
Step 3: Booting into TWRP
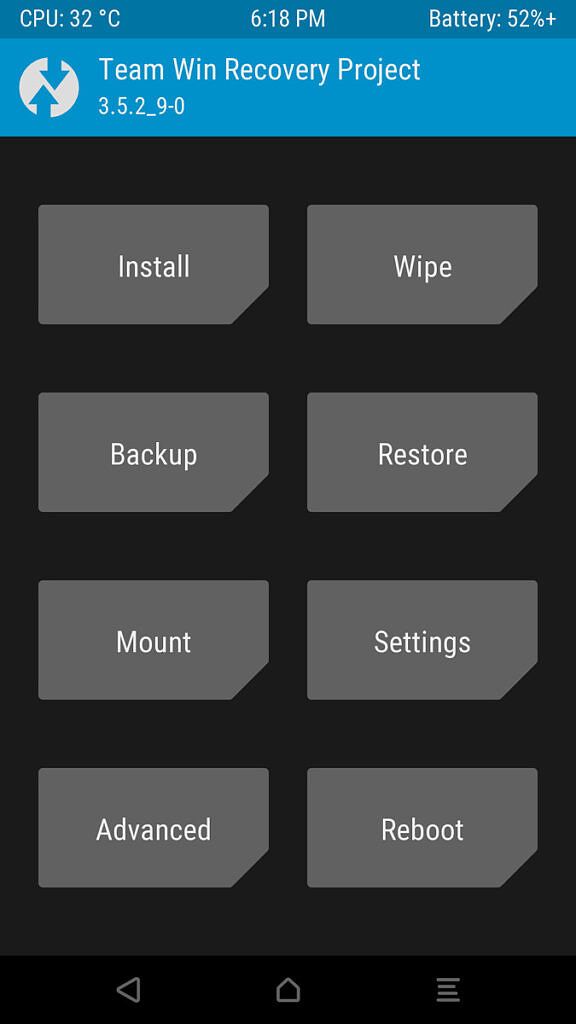
Once you've copied the ROM and GApps files to your phone's internal memory, it's time to boot into TWRP to flash the files. If you're not familiar with booting into recovery mode on your phone, we have a guide telling you how to boot into recovery on your phone so you can follow that to boot into TWRP. Once you're in TWRP, there are a few things you need to do before installing the ROM which we'll go over in the next step.
Step 4: Installing the Custom ROM
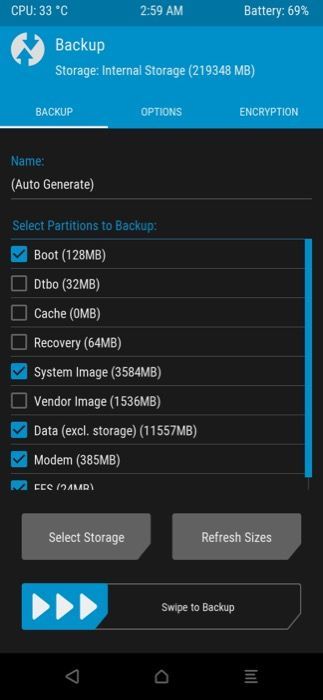
Once you're in TWRP, it's a good idea to take a snapshot of your entire system (previously known as "nandroid backup") before proceeding further. This can be useful in case you end up with a failed installation. You'll be able to boot into TWRP and restore the backup to go back to the previous state of your device.
- To do this, select the Backup option in TWRP.
- Select Boot, System Image, Data, Modem, and EFS, and then Swipe to backup. Wait until it's done.
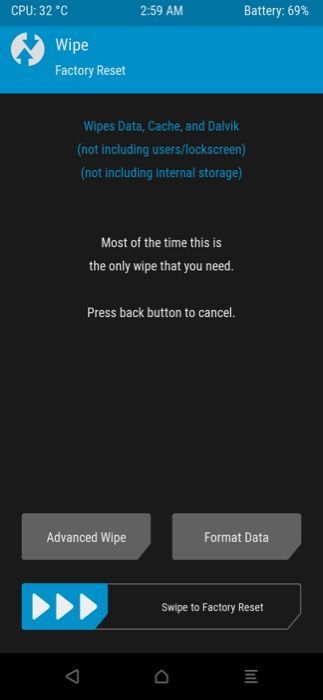
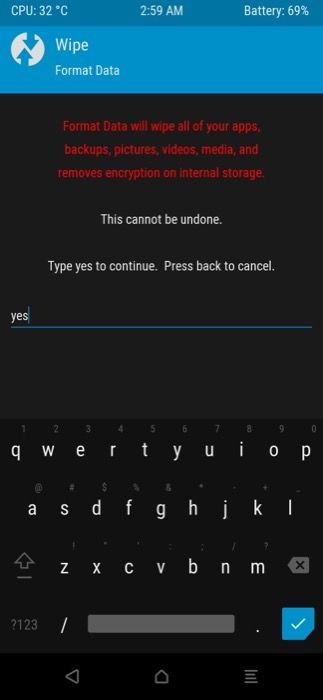
- This step will wipe your entire phone. Go back to the main menu of TWRP and select Wipe. Then, Swipe to Factory Reset. Select the Format Data option, type in yes, and select the tick mark to format your phone. Note that formatting the
/datapartition will need you to reboot once so that TWRP can properly identify the newly created file system. - Moreover, since the internal memory of the device is wiped during formatting, you must copy the ROM and GApps files once again to your phone's storage.
- You can do this from within TWRP itself. Head over to the Mount section and select the Enable MTP option.
- Now, connect your phone to your PC, and it should be detected as a storage device. Transfer the ROM and GApps packages.
- Once done, go back to the main menu on TWRP and select Install. Browse to the location where you saved the ROM and GApps files. First, select the ROM and Swipe to Install it.
- Then, head back to the previous menu and select the GApps file. Install that as well.
- Once the installation is complete, select Reboot to System.
- In case the ROM and GApps files are stored in your PC and you don't want to transfer them to the phone for flashing, you can opt for the ADB sideload feature. The option can be found under the Advanced section of TWRP. This way, you can stream the ZIP file(s) and perform the flashing operation on the fly.
- For custom ROM distributions that offer in-house recovery solutions, you might find some differences in the menu layouts and some of the aforementioned nomenclatures. Nonetheless, the basic flashing principle remains the same.
4 Images
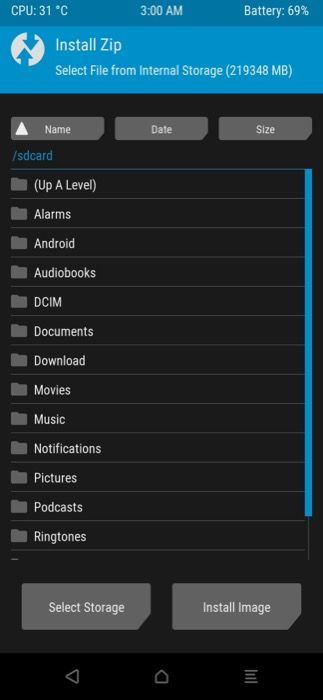
If your installation does not boot with this sequence of steps, you may need to flash/install the ROM, reboot back into recovery, wipe the data partition once again, and then flash the GApps file. This additional reboot is needed in some cases.
If everything goes right, you should now have a custom Android ROM installed on your phone! Wait for your phone to boot up. It may take a while for the initial boot process so don't panic, your phone will boot into the setup process.
Below you can find some representational screenshots (via XDA New member Super291) of a Samsung Galaxy Z Fold 3 booting a custom ROM based on Google Pixel's software goodies:
3 Images


That's how you can install a custom Android ROM on your phone. It's a fairly simple process and with a little bit of time and patience, you can enjoy a fresh new ROM on your phone with added features, customization, theming, and more. If you installed a custom ROM and you don't like it, or it has issues, just download a new ROM and repeat the installation process.

Comments
Post a Comment